")


Getting Started With Your New FPV Drone
Thank you very much for the purchase of your Ready To Fly FPV drone package! We’ve done our best to ensure everything is setup for you prior to dispatch, however it is important to read these instructions in full so that you can make the most of your kit without any troubleshooting required.
FREQUENTLY ASKED QUESTIONS
Before getting started, read our FAQS!
5 Important Safety Tips!
- Always turn on the Transmitter Radio before plugging in your drone.
- Ensure you stand at least 2m away from the drone before arming or preparing to take off.
- Always remove the propellers before changing any software settings on the drone.
- Never leave any charging batteries unattended.
- Never fly over other people.
Not following these rules can result in severe injury or bodily harm.
INSTALLING THE PROPELLERS
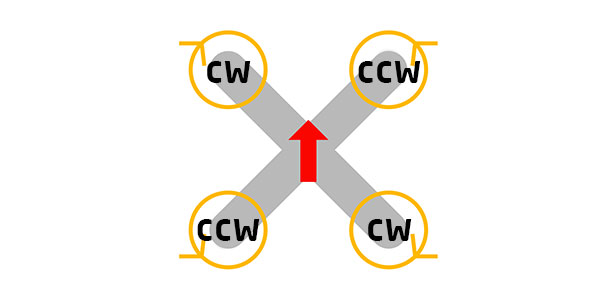
Before attempting to put the propellers on your new model, it’s important to understand the difference between CW and CCW propellers. Each set of 4 propellers includes two of each. CW and CCW are paired diagonally across from eachother.
You’ll need an M5 spanner or propeller tool to fasten the propeller nut. It is very important the nut is reasonably tight and the propellers cannot loosely spin.
PRACTICE ON A SIMULATOR
Your new controller is compatible with many FPV simulator programs. To save your drone from the first few crashes when flying it for the first time, we highly recommend practicing on a simulator first. There are plenty of great programs out there that will allow you to accurately experience the controls and flight experience of fpv drones.
Our top picks:
To connect your controller to your simulator, you can either use a Simulator USB Dongle, USB cable, or wirelessly by connecting it straight through your drone’s USB port on the flight controller. View the tutorial here
BINDING YOUR DRONE TO YOUR TRANSMITTER
If you’ve ordered an RTF (Ready To Fly) package with a transmitter, you can skip this part – we’ve already done this for you. If you ordered a BNF model, you will need to bind the receiver with your transmitter. Please read the guide below.
Read our Bind and Fly setup guide here
Please note: If you are concerned that your drone and controller have become unbound, please read on and check through the rest of this page for information on your issue. Beginners may report that the controller and drone are not bound or have become unbound, however this is likely not the case. Generally speaking, once bound, they do not just unbind themselves unless changes have been made to either the controller of the drone.
LEARN HOW TO USE BETAFLIGHT
Betaflight is the software running on your FPV drone. It is an open-source project built and maintained by volunteers. You DO NOT need to update the firmware on your drone prior to flying. Doing so will DELETE all the settings we have applied to setup your model and you will not be able to fly. We encourage you to become familiar with betaflight so that you can make changes to your model to suit your preferences. Please visit our Learn site for tutorials.

Betaflight has a configurator which can be run on Windows/OSX. The configurator software allows you to tweak with just about every setting on your drone, including how the controller inputs feel, the behaviour of your drone, and the configuration of the OSD in your FPV feed.
To connect to betaflight, you’ll typically need a micro-USB cable which plugs into the USB port on your flight controller board. You may also need to install some drivers the first time you connect.
As you grow more comfortable using and flying you new FPV drone, you’ll likely want to change some of the flight characteristics of your quad to better fit your stlye of flying. You may also want to fine tune some settings which includes calibrating your voltage and current sensor to get a more accurate measure of the battery.
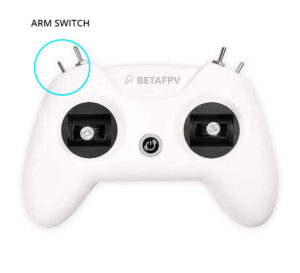
ARMING/DISARMING YOUR DRONE
The arming switch is a switch on your controller which turns the drone’s motors on and off. We have set the Arm switch to the top left of the controller for quick access. It’s important to develop a habit of reaching for the arm switch if you’ve crashed. By disarming the motors quickly, you can save the motors from a ‘burnout’ where the motor will try to spin even when it’s stuck in the ground. If the motor tries to spin but is stuck, you may damage the internal coils which will result in costly repairs to the Motor or Electronic Speed Controller (ESC) board.
USING YOUR BATTERIES
FPV Drone batteries use a chemistry called Lithium Polymer, or LiPo for short. These batteries do not have any protection, so it is important you take care of them while using them and charging them. Unlike consumer electronic devices which use Li-ion batteries, your LiPo batteries will become permanently damaged if you do not take care of them.
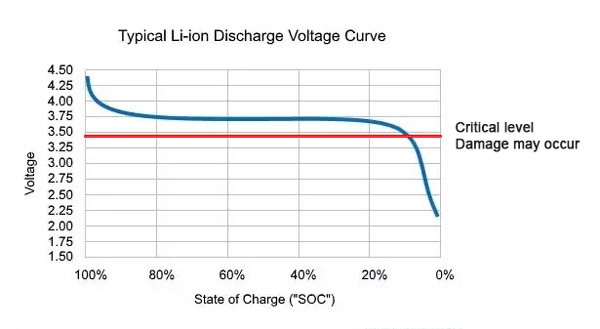
You need to pay close attention to the voltage levels and messages shown on the FPV display on your model. A battery is low charge when it reaches approximately 3.7V and fully charged at 4.2V. Betaflight will usually alert you to when the battery reaches a low voltage, and it is important you land as soon as possible to avoid damage to your batteries.
If the batteries are over-discharged, they may swell up and become puffy. Once this happens, the batteries are permanently damaged and should not be used again. To prevent this from happening, it is very important that you pay attention to the battery readings on the display of the FPV feed.
More information about caring for batteries: https://www.kiwiquads.co.nz/caring-for-lipo-and-lihv-batteries/
BETAFLIGHT FLYING MODES
There are several different flying modes built into Betaflight which control how your quad responds to stick input. We’ll break these down into the three most basic modes below. We recommend starting on Level mode so you can practice how each stick input feels and practice throttle control.
Acro mode
This is the default setting on your quad if no other mode is set. You have complete control over the quad when flying, with no assistance at all. This is the most common way of flying but not the easiest for beginners. It is worth mentioning Air mode is a variation of Acro mode where the propellers will always spin, even if the throttle is at 0.
Level Mode
Level mode means that if you let the right stick (pitch/roll) center itself, the quad will balance itself back to level. This does not include any momentum or drift as the quad will not hold itself in place. You will still need to apply the correct throttle control as the quad will not keep itself hovering automatically. Level mode also applies an artificial limit to how far your quad can tilt in any direction. This means you will not be able to do any flips or tricks.
Horizon Mode
In Horizon mode, your quad will self balance just like level mode does, except with the artificial tilt limit removed. If you apply a full forward pitch, your quad will continue to pitch forward until it goes upside down.
BETFLIGHT ERROR MESSAGES
Below you’ll find the most common faults you will see in the Betaflight OSD. For a full list of Betaflight error messages, see the official documentation on GitHub here.
- NOGYRO – If you’re seeing this error after a flash, you’ve likely flashed the wrong Betaflight Target to your flight controller. If you haven’t recently flashed your board, this error may indicate a hardware fault.
- FAILSAFE – Your quad has experienced a failsafe state. This may be due to a loss of connection between the transmitter and receiver, a receiver hardware fault, or a bad soldering connection which has caused the link between flight controller and receiver to fail.
- RXLOSS – Your flight controller has lost connection to the receiver. It may indicate a bad connection or loose wiring.
- BOXFAILSAFE – You have activated the ‘failsafe’ mode which is dictated by the Modes tab in the Betaflight Configurator.
- RUNAWAY – The likely cause of this is you’ve got either the motors spinning the wrong way, or you’ve put the propellers on wrong. A runaway is a safety prevention to ensure your quad does not go crazy if something is incorrectly configured. This condition is triggered in the first few seconds of flight. It can also occassionally be triggered accidentally by launching too fast.
- THROTTLE – You need to ensure the throttle is at 0 before arming. If you’re seeing this and your throttle is at 0 before arming, then your channels are likely misconfigured. You may need to change your mapping from AETR to TAER in the Receiver tab in Betaflight Configurator.
- ANGLE – This condition triggers if the angle of the quad exceeds the Arming Angle setting in the Configuration tab in Betaflight Configurator. To disable this check, set the Arming Angle to 180. This fault may also indicate a need to recalibrate the gyro on your quad.
- NOPREARM – You have not triggered your pre-arm switch before your arming switch.
YOUR FPV VIDEO LINK
With the introduction of DJI’s HD Digital FPV technology, we now have two main technologies for getting video feed to your FPV goggles. If you’re using an analogue FPV feed, read ahead. Otherwise, you may want to read our article on DJI HD FPV here: Everything you need to know about the DJI HD FPV System.
The video connection between your FPV drone and FPV goggles relies of analogue radio wave transmission – which is the same technology used to get radio in your car. Just like in your car, if you go out of range, your received signal degrades until you see just static. If your signal starts to become full of static, you’ll need to fly your drone closer to get better reception.
Other factors that influence your FPV signal include flying behind metal structures, mountains or hills, buildings and other obstacles, the hardware used such as antennas on your FPV drone or goggles, and also the output power of your video transmitter.
Read: How to change your VTX settings to increase the power output
The easiest way to enhance your FPV feed is by using a high powered video transmitter (or VTX) and a decent set of FPV goggles such as the Fat Shark Scouts or better. To set it to maximum power, you will need to change the output power of your VTX by changing the setting in the OSD in Betaflight.
TIPS/TRICKS FOR BEGINNERS
- The drone and controller will not work or arm until the throttle is set to the very bottom.
- FPV drones do not have power switches. When the battery is plugged in, it is on!
- You must maintain line of sight with the drone to ensure good video and RC connection.
- Do not leave the drone plugged in when not flying. The video transmitter requires air pushed over it from flying and may overheat if left too long.
- Do not fly far away or over water until you are completely confident with the drone’s limitations.
- Google search your questions for quick answers! There is HEAPS of content available for free online.
TROUBLESHOOTING
If you’ve tried all the above tips and tricks and still haven’t been able to solve your issue, please get in contact with us. We’re here to help you!
Email KiwiQuads Support: [email protected]